Connect Razorpay
Add your Razorpay keys, set the default redirect page, and set up the webhook so paid links settle on their own.
You will add your Razorpay account to AxisIQ so that payment links are created and settled with your own keys.
Before you start: you need Full control under Collecting payments on the Roles page. You also need a Razorpay account and its API keys (Razorpay Dashboard → Account & Settings → API Keys).
Steps
- Open Invoices & Payments › Connections.
- Click Add connection. The dialog is called Add a payment connection.
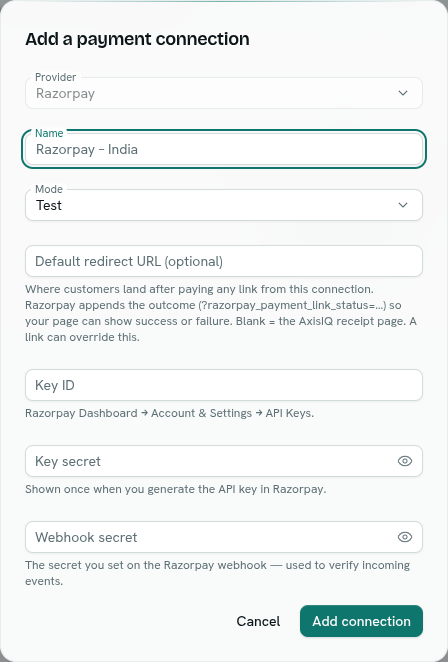
- Fill in the form. Provider is fixed to Razorpay.
Field Required Notes Name Yes Up to 120 characters, for example "Razorpay – India". Mode Yes Test or Live. Choose the one that matches your keys. Default redirect URL (optional) No Where customers land after paying any link from this connection. A link can override it. Key ID Yes From the Razorpay dashboard, for example rzp_live_….Key secret Yes Shown once by Razorpay when you generate the key. Webhook secret No The secret you set on the Razorpay webhook. You can add it later. - Click Add connection. AxisIQ checks the keys with Razorpay before saving. If Razorpay rejects them, the dialog shows the error and nothing is saved.
Set up the webhook
The webhook is how Razorpay tells AxisIQ that a link was paid. Without it you can still use Refresh status on a link (see Payment links).
- In Connections, open the connection's ⋯ menu and choose Edit.
- Copy the Webhook URL shown in the dialog. It looks like
https://axisiq.co/webhooks/payments/…and is unique to this connection. - In Razorpay, go to Settings → Webhooks and add that URL. Choose a secret.
- Subscribe to the payment link events.
payment_link.paidis the one that settles a payment.payment_link.cancelledandpayment_link.expiredalso update the link in AxisIQ. - Back in AxisIQ, paste the secret into Webhook secret and click Save changes.
What happens next
- The connection appears in the list with its Mode badge and a Health indicator ("Connected", "Checked ", or the error text).
- The connection is offered under Collect through when you create a link.
- Your secrets are encrypted. They are never shown again, and the edit form leaves them blank.
Manage a connection
Right-click a row, or use its ⋯ button:
- Test connection — re-checks the keys. You see " is reachable" or " failed its check".
- Edit — change the name, mode, redirect URL or keys. Leave a secret blank to keep the saved one. Saving re-checks your keys. Clearing the redirect URL clears it.
- Remove — asks "Remove ""? Existing links stop settling." Click Remove to confirm.
Important: Removing a connection means paid links from it no longer settle into payment records.
Tips
- Start with Test keys and a test link to see the whole flow before switching to Live.
- Several connections are fine, for example one per Razorpay account.
Troubleshooting
The dialog shows an error when adding Razorpay rejected the keys, or the name was empty. Re-copy the key ID and secret and check the mode.
A paid link still shows "created" The webhook is missing or its secret does not match. Check the URL and secret, then use Refresh status on the link.
Health shows an error Click Test connection. If it still fails, the keys may have been revoked in Razorpay. Edit the connection and paste new keys.