Set up a register
Create a register, choose its payment methods, map your product fields and set the inventory source.
A register is one counter. All of its behaviour is set in one dialog.
Before you start: you need Full control under In-store checkout on the Roles page. You should have a store Location record, a record type with your products, and, for UPI, a Razorpay connection.
Steps
- Open In-Store Checkout › Registers and click New register.
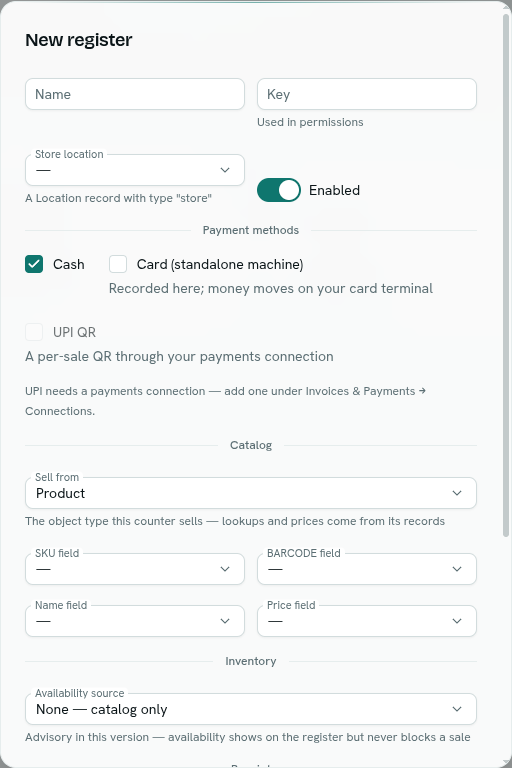
- Fill in the top section:
Field Notes Name Required, up to 120 characters, for example "Till 1". Key Filled from the name. Lowercase letters, digits, -or_, 1 to 60 characters. Used in permissions.Store location Pick a Location record whose type is "store". Optional. If none exist the hint says to add one. Enabled A disabled register cannot sell. - Under Payment methods, tick what the counter accepts:
- Cash
- Card (standalone machine) — recorded in AxisIQ. The money moves on your card terminal.
- UPI QR — creates a QR for each sale through your payments connection. Disabled until you have a payment connection. Then choose the Payments connection (required when UPI is on).
- Under Catalog, choose Sell from, the record type this counter sells (defaults to
products). Then map the fields:Field Used for SKU field Lookup by SKU. BARCODE field Lookup when a barcode is scanned. Name field The name shown in the cart. Price field The unit price. Needed for lookups to work. - Under Inventory, choose Availability source:
- None — catalog only
- Query — a read-only SELECT returns available stock, then enter the Stock query. Inventory is advisory only. It never blocks a sale.
- Click Create register. A toast says "Register created". The button is disabled until there is a name, and, with UPI on, a connection.
What happens next
The register appears in the list with its payment method badges, a device count and a status (Open or Disabled). Click it to open the full-screen register.
Manage a register
Right-click a row or use the ⋯ button:
- Open register and Open in new tab.
- Edit — the same dialog. The Key is locked ("Keys are permanent — they anchor permissions"). Click Save; a toast says "Register updated".
- Copy register key.
- Delete — asks "Delete ""? Its sales history stays." Click Delete.
Settings reference
| Setting | Options |
|---|---|
| Payment methods | Cash, Card, UPI QR. Only the ones you tick are offered at the register. |
| UPI | Needs a payments connection. A register cannot be saved with UPI on and no connection. |
| Catalog | Record type plus SKU, barcode, name and price fields. A mapping, not a copy. |
| Inventory | None, or a stock query. Advisory. |
Note: Receipts print as a simple browser receipt. There are no receipt settings yet.
Troubleshooting
"key: use lowercase letters, digits, - or _ (1-60 chars)" Edit the Key to use only those characters.
"UPI needs a configured payments provider" or "UPI tender needs a payments connection" Add a Razorpay connection under Invoices & Payments › Connections, then pick it here.
"inventory query mode needs a query" Enter a Stock query or choose None.